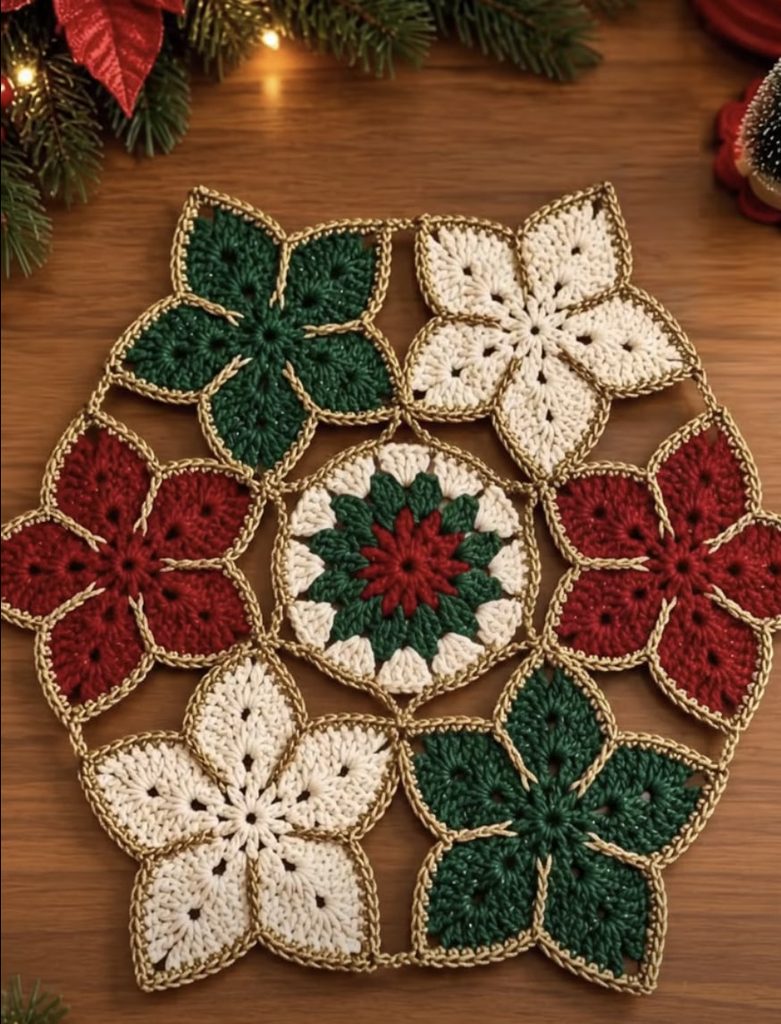
Bring a little handmade Christmas magic to your table with this beautiful Christmas poinsettia crochet table runner! Deep evergreen petals, rich red flowers, soft ivory blooms, and delicate gold-colored edging create a festive decoration that feels both traditional and special. The design combines individual floral motifs with a colorful central medallion, making it a lovely project for holiday dinners, seasonal gifts, or a cozy Christmas home. If you enjoy crocheting decorative flowers, this free crochet pattern is a wonderful way to turn simple yarn into a memorable piece of holiday decor.
About this design
This Christmas poinsettia crochet table runner is inspired by a floral arrangement made from five large flower motifs surrounding a central circular medallion. Two flowers are worked in deep forest green, two in warm ivory, and two in traditional Christmas red when counting the prominent outer flowers in the reference arrangement. The center features a festive red-and-green flower framed by ivory stitches.
Each outer flower has five pointed, dimensional petals. The petals radiate from a small center and are shaped using taller crochet stitches, chain spaces, and carefully placed increases. A contrasting gold-colored outline highlights the petal edges and gives the finished project a delicate decorative finish.
The arrangement is intentionally open rather than a solid rectangular fabric. The individual flowers remain visually distinct, with their petal outlines creating the overall shape. This makes the project especially attractive as a small centerpiece runner on a wooden dining table, sideboard, coffee table, or console.
The instructions below create individual motifs first, followed by a central medallion and a final assembly stage. The finished piece is a decorative floral mat or mini runner inspired by the photograph. You can extend the design by adding more motifs to make a longer table runner.
Skill level & what you need to know
Difficulty: Intermediate.
You should be comfortable making chain stitches, slip stitches, single crochet, half double crochet, and double crochet. You will also need to understand how to work multiple stitches into one space, form pointed petal shapes, change yarn colors, and sew or crochet separate motifs together.
Beginners can attempt this project by making one flower at a time. However, maintaining evenly shaped petals and joining the motifs without distorting their edges requires patience.
The main skills you’ll practice are:
- Working in rounds from a central ring.
- Creating five evenly spaced flower petals.
- Shaping petal tips with increases and decreases.
- Changing colors neatly between rounds.
- Adding a contrasting decorative border.
- Joining separate motifs into a balanced arrangement.
Materials
- Forest green yarn: approximately 50–70 g of DK-weight cotton.
- Christmas red yarn: approximately 50–70 g of DK-weight cotton.
- Warm ivory yarn: approximately 60–80 g of DK-weight cotton.
- Gold-colored yarn: approximately 25–35 g of DK-weight cotton or a similar fine yarn suitable for decorative edging. A gold-colored cotton blend is a practical alternative to metallic yarn.
- Crochet hook: 3.5 mm (US E/4), or a size that gives firm but flexible fabric.
- Yarn needle for weaving in ends and sewing motifs.
- Stitch markers, especially if you find it difficult to space five petals evenly.
- Scissors.
- Rust-proof blocking pins and a blocking mat or clean towel.
- Tape measure for checking the size of each flower.
The quantities are estimates for a small arrangement. If you make a longer runner or enlarge the flowers, purchase additional yarn. For the best result, choose cotton yarn that gives the petals enough structure to lie flat.
Abbreviations
- ch: chain.
- sl st: slip stitch.
- sc: single crochet.
- hdc: half double crochet.
- dc: double crochet.
- tr: treble crochet.
- st: stitch.
- sp: space.
- sk: skip.
- rep: repeat.
- rnd: round.
- RS: right side.
Pattern notes: This pattern uses US crochet terminology. The starting chain does not count as a stitch unless stated otherwise. Work in joined rounds, closing each round with a slip stitch. Instructions in square brackets are worked into the same space unless stated otherwise.
Gauge & finished size
Gauge is less important than consistency for this decorative project, but matching the size of your motifs will make assembly much easier.
As a starting point, one completed five-petal flower should measure approximately 10–12 cm (4–4.75 inches) across. The central medallion should measure approximately 11–13 cm (4.3–5.1 inches) across after blocking.
Make one complete flower before producing the remaining motifs. If it is too large, try a smaller hook. If the petals feel stiff or curl inward, try a larger hook or slightly looser tension.
To create a longer runner, make additional flowers and arrange them along the sides of the center medallion. Keep the motifs similar in size, and test the arrangement on a flat surface before joining.
Pattern instructions
Part 1: Five-petal flower motif
Make six flowers in total for a fuller arrangement inspired by the photograph: two forest green, two ivory, and two Christmas red. The photographed composition uses a combination of prominent outer flowers and a central medallion; arrange your completed motifs to achieve a similar open floral silhouette.
Foundation ring: With the chosen flower color, ch 5 and join with a sl st to form a ring. Alternatively, use a magic ring if you prefer a tightly closed center.
Round 1: Flower center
Ch 1, then work 10 sc into the ring. Join with a sl st to the first sc. You should have 10 sc.
Pull the center ring snug if you used a magic ring. Keep the stitches firm enough that the center does not develop a large hole, but avoid pulling so tightly that the ring puckers.
Round 2: Create five petal spaces
Ch 1. Work 1 sc in the next stitch, ch 3, sk 1 stitch, and repeat this sequence around. Join with a sl st to the first sc.
You should have five chain-3 spaces separated by single crochet stitches. These spaces form the foundation for the five petals. If your count is uneven, undo the round and correct it now rather than trying to hide the problem in the next round.
Round 3: First petal layer
Sl st into the first ch-3 space. In that same space, work 1 sc, 1 hdc, 3 dc, 1 hdc, and 1 sc. This creates the first rounded petal.
Repeat the same sequence in each remaining ch-3 space. Join with a sl st to the first sc. You should now have five clearly defined petals.
For a more pointed flower, work 1 dc, 3 tr, and 1 dc in each petal space instead. This alternative makes the petals taller, so use it only if you want a more dramatic shape and can keep the motif dimensions consistent.
Round 4: Shape and define the petals
With the flower facing you, sl st to the top of the first petal. Ch 1 and work 1 sc across the petal edge, placing stitches evenly along both sides and the outer curve. At the top of each petal, work 3 sc into the central stitch or space to form a defined point.
Continue around all five petals. Where two petals meet, make 1 sl st into the valley between them to accentuate the separation. Join with a sl st to the first sc.
The exact number of stitches along each petal edge will depend on the height of the stitches used in Round 3. Aim for a neat outline with no tight pulling. The important part is repeating the same edging method on every petal so the flower remains balanced.
Round 5: Decorative gold outline
Join gold-colored yarn with a sl st at the base of a petal. Ch 1 and work sl sts around the outside edge of the petal, placing 3 sl sts into the tip stitch or tip space. Work 1 sl st into each valley between petals to keep the outline defined.
Repeat around all five petals and join with a sl st. Fasten off and weave in the ends on the wrong side.
For a slightly raised outline resembling the reference image, use a contrasting surface slip stitch instead of a simple border. Keep the yarn tension relaxed enough that the gold edging does not draw the petal tips inward.
Make the remaining flower motifs
Repeat Rounds 1–5 to make all six flowers. Work two in forest green, two in ivory, and two in red. The gold edging should be applied consistently to each motif.
After finishing each flower, lay it flat and compare it with the first completed motif. Make small tension adjustments if necessary. Even a few millimeters of difference can become noticeable when the flowers are arranged together.
Part 2: Central Christmas medallion
The central motif combines a red flower center, a green floral ring, and an ivory outer round. This creates the festive focal point between the larger flowers.
Round 1: Red center
With red yarn, make a magic ring. Ch 1 and work 10 sc into the ring. Join with a sl st to the first sc. Tighten the center ring.
Round 2: Red center petals
Ch 1. Work the following sequence into each of the next five alternating stitch positions: sl st, ch 2, 2 dc, ch 2, sl st, using the intervening stitches as the valleys between petals. Repeat around to form five small red petals.
Because this round is decorative, focus on keeping the five petals evenly spaced. If the center becomes crowded, use smaller stitches or reduce the height of the petal stitches.
Round 3: Green floral ring
Join forest green yarn in a valley between red petals. Ch 1 and work 1 sc in that valley, then ch 3. Work 1 sc in the next valley and ch 3 again. Repeat around to create five chain spaces positioned between the red petals. Join with a sl st.
In each chain-3 space, work 1 sc, 1 hdc, 3 dc, 1 hdc, and 1 sc. Join with a sl st to complete the green floral ring.
For a denser appearance, work an additional sc into each valley between the green petals. This helps define the separation between the red center and the green outer flower.
Round 4: Ivory medallion background
Join ivory yarn at the top of a green petal. Ch 1 and work sc evenly around the outside edge of the green flower. At each petal tip, work 3 sc into the same stitch or space. In each valley between petals, work 1 sc.
This round should form a reasonably even outer edge around the green flower. Do not pull tightly at the valleys, or the medallion may curl upward.
Round 5: Build the circular frame
Ch 2, then work 2 dc into the next stitch and 1 dc into the following stitch, repeating this sequence around the ivory round. Adjust the number of increases as necessary to keep the medallion flat.
In practical terms, the fabric should expand gently rather than form a bowl or develop ruffles. If it begins to ripple, remove a few increases. If it curls inward, add increases evenly across the round.
Round 6: Gold edging
Join gold-colored yarn at the outer edge of the medallion. Work sl sts evenly around the entire circumference. Use an extra sl st at each prominent corner or curve only if needed to preserve the shape.
Fasten off, weave in the ends, and place the medallion on a flat surface. The center should sit smoothly without cupping.
Part 3: Arrange the floral runner
Lay the central medallion flat on your work surface. Position the six flower motifs around it in a pleasing arrangement, alternating red, green, and ivory to balance the color distribution.
For a compact arrangement inspired by the photograph, position the flowers so their inner petal edges approach the medallion and neighboring petals overlap slightly in the overall silhouette. Avoid placing all flowers of the same color together. The contrast between ivory and dark green is particularly important to the final appearance.
Before joining anything, check that the arrangement is symmetrical enough to lie flat. You may need to rotate individual flowers so their petals fit together naturally.
Part 4: Join the motifs
There are two suitable joining methods:
- Whipstitch joining: Place the motifs with their right sides facing upward. Using a yarn needle and matching yarn, sew the closest points or short sections of adjacent petal edges together. Keep the stitches small and consistent.
- Slip-stitch joining: Hold two neighboring motif edges together and work slip stitches through corresponding edge loops. Use a hook size that does not make the joins bulky.
For a floral arrangement like the reference, joining at selected petal edges rather than sewing the entire circumference gives the design a more open, lace-like appearance. Join only enough points to make the piece stable.
Attach the central medallion to the surrounding flowers at several balanced points. Work slowly and alternate between sides so the arrangement does not shift in one direction.
Part 5: Optional gold connecting details
To emphasize the gold outlines, add small connecting slip stitches in gold-colored yarn at selected joining points. These stitches should remain subtle. Too many gold connectors can make the arrangement look crowded and distract from the petals.
Weave in all remaining ends on the wrong side, taking care not to create thick knots beneath the flowers.
Assembling & joining
Assembly determines whether the finished runner looks polished. Work on a flat table or blocking mat, and keep the central medallion in place while arranging the outer flowers.
First, pin the central medallion lightly. Position the surrounding flowers one at a time, checking the distance between their centers and the medallion. If a petal naturally overlaps another motif, rotate the flower before sewing rather than forcing the edges into position.
Use small, even joining stitches. A bulky join can pull the flower centers out of alignment, while a very loose join can leave visible gaps that make the runner unstable.
After attaching the first two flowers, lay the work flat again. Continue adding motifs in balanced pairs until the arrangement is complete. This method helps prevent the runner from becoming twisted or lopsided.
For a longer version, add another row of flower motifs at the ends. Make sure each new motif is joined at multiple points so the runner can be lifted without individual flowers separating.
Pro tips for a flawless finish
- Choose firm cotton yarn. Cotton helps the petals hold their shape and creates crisp stitch definition.
- Keep all flower centers consistent. Use the same number of stitches and the same tension for every motif.
- Mark the five petal spaces. Stitch markers make it easier to divide the center evenly and avoid accidental extra petals.
- Use gold sparingly. A narrow gold edge adds definition without overpowering the red, green, and ivory palette.
- Check the motif size before making multiples. Finish one flower completely, including its border, before crocheting the rest.
- Weave in ends securely. Change direction while weaving so ends are less likely to loosen during gentle washing.
- Test the assembly on a flat surface. Arrange every motif before sewing. A few minutes of planning can prevent hours of unpicking.
Blocking & finishing
Blocking helps the petals open and makes the floral outline more defined. Because this design contains separate motifs, block the flowers before joining if their edges are uneven. You can also lightly block the assembled runner after joining.
For cotton yarn, gently wet the piece with cool or lukewarm water and a suitable mild detergent. Rinse carefully without twisting. Press excess water out between clean towels.
Place the runner on a blocking mat, arrange each petal into its intended shape, and pin the tips evenly. Avoid stretching the center medallion more than the surrounding flowers. Allow the project to dry completely before removing the pins.
If your yarn label recommends a different care method, follow its instructions. Avoid high heat unless the yarn manufacturer specifically permits it.
When the runner is dry, inspect the joins and weave in any remaining ends. Place it on a flat surface and smooth the flowers gently with your hands.
Common mistakes & how to fix them
- Uneven petals: This usually happens when the chain spaces are not evenly distributed. Count the five spaces in Round 2 and use stitch markers if needed.
- Flower edges curl: The edging may be too tight, or the petals may need more stitches along their outer curves. Try a larger hook or relax your tension.
- Petals look floppy: Your hook may be too large, or the yarn may be too soft. Try a smaller hook and choose a firmer cotton yarn.
- The center medallion cups: The circular rounds need more increases. Add increases at evenly spaced intervals until the piece lies flat.
- The outer round ripples: There may be too many increases. Remove a few and distribute the remaining increases more evenly.
- Gold edging pulls the petals inward: Loosen the slip stitches. The border should follow the petal shape rather than draw it closed.
- The assembled runner twists: The motifs may have been joined under uneven tension. Unpick the tight joins, flatten the arrangement, and sew the motifs together without stretching them.
Frequently asked questions
1. Is this Christmas poinsettia crochet table runner suitable for beginners?
The project is best suited to intermediate crocheters because it combines shaped petals, multiple colors, decorative edging, and motif assembly. A confident beginner can learn the techniques by making one flower at a time and checking the stitch counts carefully.
2. Can I make the flowers in different colors?
Absolutely. Red, evergreen, ivory, and gold create a traditional Christmas look, but you could use burgundy, cream, and champagne gold for a softer design. Keep the edging consistent to tie the motifs together.
3. Can I make a longer table runner?
Yes. Add more flower motifs along the ends or sides. Keep the flowers the same size and plan the arrangement before joining. The extra yarn required will depend on how many motifs you add.
4. Which yarn is best for this pattern?
DK-weight cotton is a good choice because it offers clear stitch definition and helps the petals retain their shape. You can use a cotton blend, provided the finished motifs are firm enough to lie flat.
5. Can I use a different crochet hook?
Yes. Hook size can be adjusted to suit your yarn and tension. A smaller hook produces firmer motifs, while a larger hook creates softer, more open stitches. Always make a test flower before completing the full set.
6. How should I wash the finished runner?
Follow the care instructions for your yarn. For washable cotton, gentle hand washing in cool or lukewarm water is a safe starting point. Avoid twisting the piece, and reshape the petals while it dries flat.
7. Can I sell items made from this pattern?
You can generally sell finished handmade items you make, subject to applicable laws and any separate terms attached to the pattern you use. If you publish or share this reconstructed pattern, make sure you have the necessary rights and do not claim someone else’s original instructions as your own. Credit the source when its actual terms require it.
8. Why does my flower look different from the photograph?
The photograph shows a finished object but does not provide the original stitch counts, yarn brand, hook size, or construction details. Differences in yarn, tension, and petal shaping can change the result. Make a test motif and adjust the stitch height and hook size until you achieve the look you prefer.
How to style it at home
This floral crochet runner looks especially attractive against natural wood, where the warm brown surface makes the red, green, ivory, and gold details stand out. Place it in the center of a dining table with simple ivory napkins, wooden serving boards, or understated Christmas decorations.
For a festive coffee table, pair the runner with a small evergreen arrangement and warm candlelight. Keep the surrounding accessories simple so the dimensional flower motifs remain the focal point.
You can also display it on a console table, sideboard, or shelf during the holiday season. Because the design is open and floral, it works well in traditional, rustic, cottage-style, and handmade Christmas interiors.
If using the runner beneath candles or serving dishes, remember that cotton yarn is flammable and is not a heat-resistant mat. Keep it away from open flames and hot cookware.
Why you’ll love this pattern
This Christmas flower runner brings together several satisfying crochet techniques in one small project. You can complete individual flowers in manageable sessions, practice neat color changes, and learn how to join motifs into a decorative arrangement.
The contrasting petals make the finished piece visually interesting from across the room, while the gold edging gives the flowers a coordinated finish. You can also reuse the flower motif in other projects, including festive garlands, decorative wall hangings, gift embellishments, and larger seasonal table coverings.
Most importantly, the project allows you to create something personal. Handmade Christmas decorations often become part of family traditions, brought out year after year and remembered long after the season ends.
Make it your own
Once you have completed the original color arrangement, try a variation that suits your home.
- Classic Christmas: Use bright red, dark evergreen, warm ivory, and gold edging.
- Elegant winter: Combine ivory petals with forest green and champagne-colored borders.
- Rustic holiday: Choose burgundy, moss green, and natural cream cotton.
- Minimalist style: Make every flower ivory and use a subtle gold outline.
- Long dining runner: Add extra flowers along the ends and maintain a balanced color sequence.
- Small centerpiece: Make fewer motifs and use the central medallion as the main focal point.
You can also experiment with petal height. Shorter double-crochet petals create a compact flower, while taller stitches create a more pointed, dramatic bloom. Whichever variation you choose, keep all motifs in the same project consistent in size and edging.
Ready to grab your hook?
Gather your favorite Christmas yarn colors and begin with one flower. Take your time shaping the petals, enjoy the contrast between the rich red and evergreen shades, and finish each motif with its delicate gold-colored outline.
When all your flowers are ready, arrange them around the central medallion and join them into a festive floral decoration. The result is a handmade Christmas crochet table runner inspired by the photograph, ready to bring warmth and personality to your holiday table.
The complete reconstructed pattern is right here on this page, so you can work through each section at your own pace. Happy crocheting, and may your holiday season be filled with creativity, comfort, and beautiful handmade details!
Leave a Reply